この記事でのバージョン
Unity 2018.2.17f1
はじめに
今回はパーリンノイズ(PerlinNoise)に使える
大小のノイズを合成して表情豊かなノイズを作るというテクニックとその実装方法の紹介です!
イメージとしては以下のような感じ
 |
なお、【Unity道場 京都スペシャル2 2017】乱数完全マスターという講演の動画で知りました。
大小のノイズ
まず、ノイズの大きい小さいとはなんぞや?という話からですが、
グラフで表すと一目瞭然。(上が大きいノイズ、下が小さいノイズ)
 |
言葉で説明すると大きいノイズとは波が高く、変化がゆるやかなノイズの事です。
そしてこの大小のノイズを合成(加算)すると以下のような感じになります。
(上が大きいノイズ、下が小さいノイズ、中央が合成したノイズ)
 |
合成したノイズは大きい変化の中にも小さい変化がある表情豊かなものになり、
これが良い感じの動きに繋がるという事です。
(使う対象にもよってはそうでない場合もあるかもしれません。)
実装
ここからはUnityでの具体的な実装の話です。
UnityではMathf.PerlinNoiseを使ってパーリンノイズを簡単に実装出来ますが、(詳しくはコチラ)
//noiseは0 ~ 1の値
float noise = Mathf.PerlinNoise(x, y);
波の高さを調整したい場合はPerlinNoiseの結果に任意の値を乗算すれば良いですし、
(乗算する値が大きいほど、波が高くなる)
//noiseは0 ~ 10の値
float noise = Mathf.PerlinNoise(x, y) * 10;
変化率を変えたい場合はPerlinNoiseの引数xとyに任意の値を乗算すれば良いです。
(乗算する値が大きいほど、変化が激しくなる)
//noiseは0 ~ 1の値のままだが、xやyの値に変化があった時にnoiseの変化が大きくなる
float noise = Mathf.PerlinNoise(x * 10, y * 10);
それらをまとめて、簡単にパーリンノイズの調整と生成が出来るクラス
PerlinNoiseGeneratorというのを作ってみました。
使用方法は以下のようにPerlinNoiseGeneratorを生成して、
//minとmaxでノイズを取得する時の最小と最大を設定(差が大きいほど大きい波になる)
//rateOfChangeでノイズの変化率を設定(値が大きいほど変化が激しくなる)
PerlinNoiseGenerator noiseGenerator   = new PerlinNoiseGenerator(min: 0, max: 10, rateOfChange: 0.4f);
GetNoiseで値を取得するだけ。
//xは時間経過で変化し、yはシードで固定される取得方法(Updateなどで使う用)
float noise = noiseGenerator.GetNoise();
//xは任意、yはシードで固定される取得方法
float noise = noiseGenerator.GetNoise(x);
//xもyも任意の取得方法
float noise = noiseGenerator.GetNoise(x, y);
先程例にあげた波形もこれとLineRendererを使って生成しています。
using System.Collections.Generic;
using UnityEngine;

public class NewBehaviourScript : MonoBehaviour {

  //パーリンノイズ生成用クラス
  private PerlinNoiseGenerator _bigNoiseGenerator = null, _smallNoiseGenerator = null;

  //波形を表示するためのラインレンダラー(Inspectorから設定)
  [SerializeField]
  private LineRenderer _bigLineRenderer = null, _smallLineRenderer = null, _combinedLineRenderer = null ;

  //x座標の間隔
  private const float X_SPAN = 0.016f;

  //=================================================================================
  //初期化
  //=================================================================================

  private void Start () {
    //パーリンノイズ生成用クラスを生成
    _bigNoiseGenerator   = new PerlinNoiseGenerator(min: 0, max: 10, rateOfChange: 0.4f);
    _smallNoiseGenerator = new PerlinNoiseGenerator(min: 0, max: 1,  rateOfChange: 10);

    //波形を生成するための点の数を設定
    int pointNum = 1800;
    _bigLineRenderer.positionCount      = pointNum;
    _smallLineRenderer.positionCount    = pointNum;
    _combinedLineRenderer.positionCount = pointNum;

    //各点を設定していく
    for (int i = 0; i < pointNum; i++) {
      //x座標を決定
      float x = i * X_SPAN;

      //ノイズ生成
      float bigNoize   = _bigNoiseGenerator.GetNoise(x);
      float smallNoize = _smallNoiseGenerator.GetNoise(x);

      //点の座標を設定
      _bigLineRenderer.SetPosition     (i, new Vector3(x, bigNoize,              0));
      _smallLineRenderer.SetPosition   (i, new Vector3(x, smallNoize,            0));
      _combinedLineRenderer.SetPosition(i, new Vector3(x, bigNoize + smallNoize, 0));
    }

  }

}
 |
なお、Updateで使おうとすると以下のような感じ。
//=================================================================================
//更新
//=================================================================================

private void Update () {
  //ノイズ生成
  float bigNoize   = _bigNoiseGenerator.GetNoise();
  float smallNoize = _smallNoiseGenerator.GetNoise();

  //新しい点の座標を設定
  float x = (_bigLineRenderer.positionCount - 1) * X_SPAN;
  SetNewPoint(_bigLineRenderer,      new Vector3(x, bigNoize,              0));
  SetNewPoint(_smallLineRenderer,    new Vector3(x, smallNoize,            0));
  SetNewPoint(_combinedLineRenderer, new Vector3(x, bigNoize + smallNoize, 0));
}

//LineRendererに新しい点を設定する(代わりに1番古い点をなくす)
private void SetNewPoint(LineRenderer lineRenderer, Vector3 newPoint){
  //現在設定されている点を取得
  Vector3[] positions = new Vector3[lineRenderer.positionCount];
  lineRenderer.GetPositions(positions);

  //1番最初の点を無視して、それ以降の点をxを一つ前の点の位置にずらして設定
  List<Vector3> positionList = new List<Vector3>();
  for (int i = 1; i < positions.Length; i++) {
    positions[i].x -= X_SPAN;
    positionList.Add(positions[i]);
  }

  //新しい点を追加し、LineRendererに設定
  positionList.Add(newPoint);
  lineRenderer.SetPositions(positionList.ToArray());
}
 |
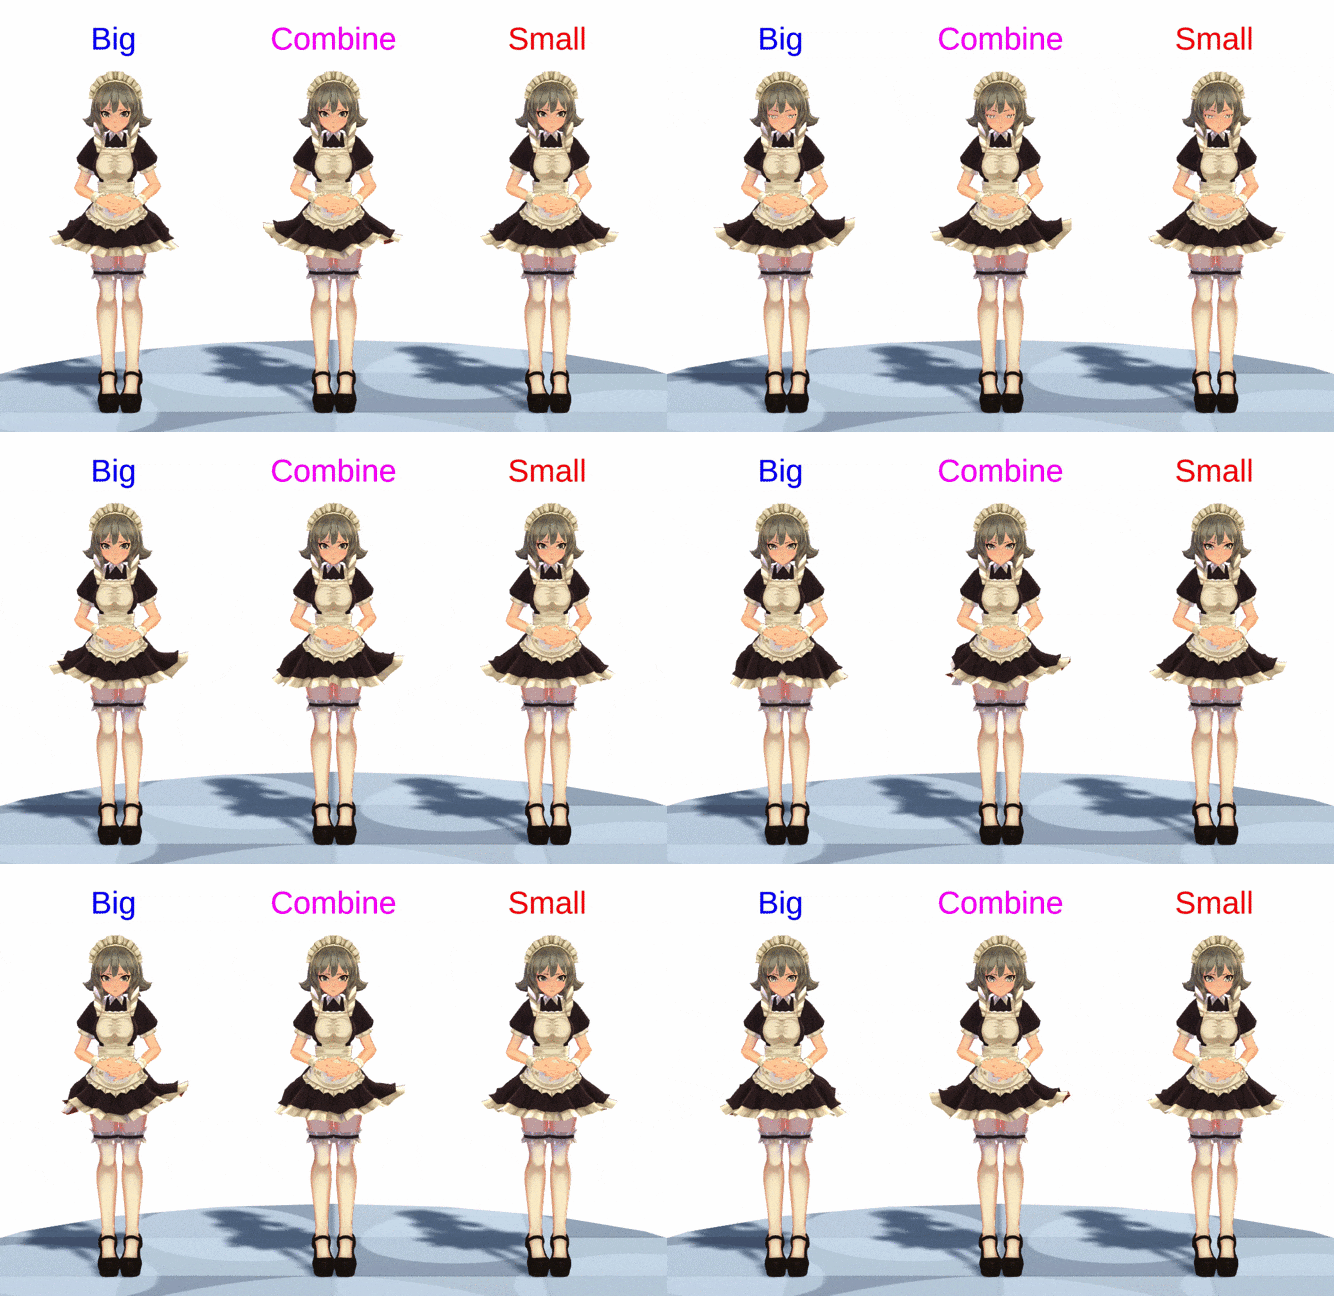
これをスカートが風でなびいているよなアニメーションに応用したのが以下のものになります。
 |
左の大きいノイズのも悪くはないですが、なめらかに動きすぎて風にしてはちょっと不自然なので、
小さいノイズを加える事でより"風っぽさ"が出せてるのではないでしょうか。
![(:3[kanのメモ帳]](https://cdn-ak.f.st-hatena.com/images/fotolife/k/kan_kikuchi/20190121/20190121175647.png)

